多态概述(polymorphism)
多态: 指的是同一个方法调用,由于对象不同可能会有不同的行为。
现实生活中,同一个方法,具体实现会完全不同。比如:同样是调用人的 休息 方法,张三是睡觉,李四是旅游,数学教授是做数学题;同样是调用人 吃饭 的方法,中国人用筷子吃饭,英国人用刀叉吃饭,印度人用手吃饭。
多态的要点:
多态是方法的多态,不是属性的多态(多态与属性无关)
多态的存在要有3个必要条件:有继承/实现关系,有方法重写,父类引用指向子类对象
父类引用指向子类对象后,用该父类引用调用子类重写的方法,此时多态就出现了
之所以每类人的吃饭方法都不一样,是因为,在人这个类的下边,中国人子类,美国人子类,印度人子类都对吃这个方法进行了重写,所以每类人的吃饭方法不一样。多态是指方法的多态也是因为这样。
多态中成员访问特点
(图1)
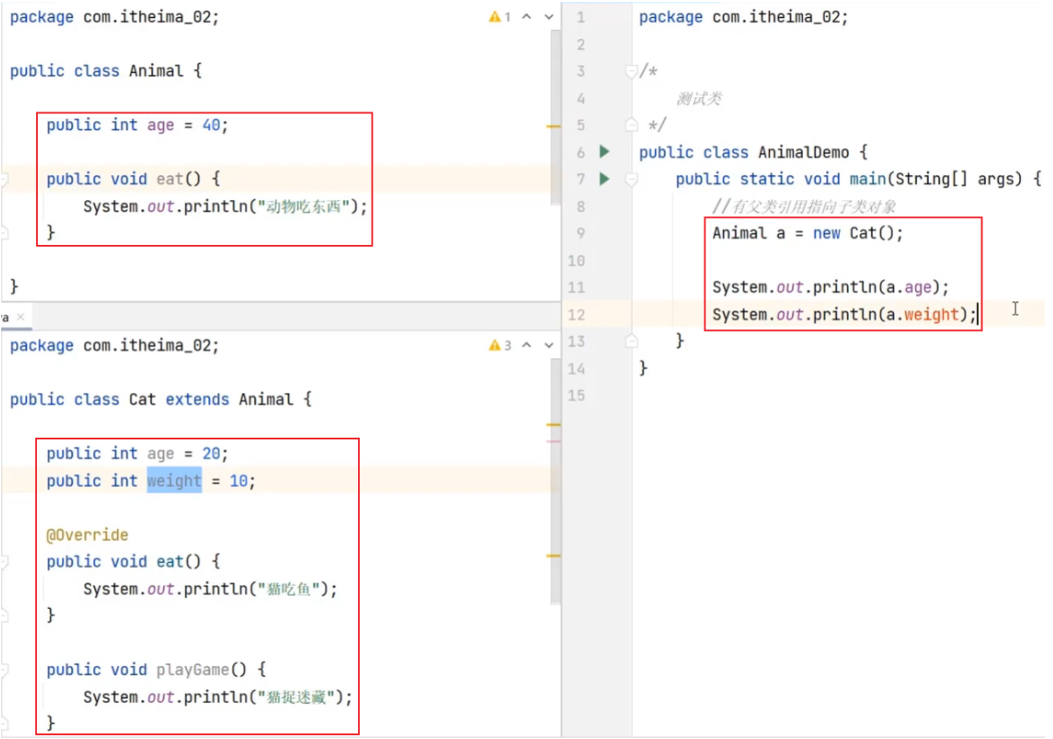
多态中,成员变量的访问特点
System.out.println(a.weight);
编译的时候看的是左边,看的是父类中有没有,如果父类中有,不会报错,如果父类中没有,就会报错
成员变量,编译看左边,运行也看左边
成员方法的访问特点
成员方法编译的时候看的也是左边,看的是父类中有没有,如果父类中有,不会报错,如果父类中没有,就会报错
成员方法,编译看左边,运行看右边
为什么成员变量和成员方法的访问不一样呢?
因为成员方法有重写,而成员变量没有
多态的好处和弊端
 1
 2
 3
 4
 5
 6
 7
 8
 9
10
11
12
13
14
15
16
17
18
19
20
21
22
23
24
25
26
27
28
29
30
31
32
33
34
35
36
37
38
39
40
41
42
43
44
45
46
public class Animal {
public void eat () {
System . out . printun ( "动物吃东西" );
}
}
public class Cat extends Animal {
@Override
public void eat (){
System . out . println ( "猫吃鱼" );
}
}
public class Dog extends Animal {
@Override
public void eat () {
System . out . println ( "狗吃骨头" );
}
}
//动物操作类
public class AnimalOperator {
public void useAnimal ( Cat c ) {
c . eat ();
}
public void useAnimal ( Dog d ) {
d . eat ();
}
}
public class AnimalDemo {
public static void main ( string [] args ) {
//创建动物操作类的对象,调用方法
AnimalOperator ao = new AnimalOperator ();
Cat c = new Cat ();
ao . useAnimal ( c ); //猫吃鱼
Dog d = new Dog ();
ao . useAnimal ( d ); //狗吃骨头
}
}
用多态进行简化
 1
 2
 3
 4
 5
 6
 7
 8
 9
10
11
12
13
14
15
16
17
18
19
20
21
22
23
24
25
26
27
28
29
30
31
32
33
34
35
36
37
38
39
40
41
42
43
44
45
46
47
48
public class Animal {
public void eat () {
System . out . printun ( "动物吃东西" );
}
}
public class Cat extends Animal {
@Override
public void eat () {
System . out . println ( "猫吃鱼" );
}
}
public class Dog extends Animal {
@Override
public void eat () {
System . out . println ( "狗吃骨头" );
}
public void LookDoor () {
System . oUt . println ( "狗看门" );
}
}
//动物操作类
public class AnimalOperator {
public void useAnimal ( Animal a ) { //Animal a = new Cat(); Animal a = new Dog();
a . eat ();
//a.LookDoor(); //编译看左边, Animal中没有LookDoor()方法, 报错
}
}
public class AnimalDemo {
public static void main ( string [] args ) {
//创建动物操作类的对象,调用方法
AnimalOperator ao = new AnimalOperator ();
Cat c = new Cat ();
ao . useAnimal ( c ); //猫吃鱼
Dog d = new Dog ();
ao . useAnimal ( d ); //狗吃骨头
}
}
多态的好处:提高了程序的扩展性,具体体现: 定义方法的时候,使用父类型作为参数,将来在使用的时候,使用具体的子类型参与操作
多态的弊端:不能使用子类的特有功能 (比如:某个方法只有子类有,父类没有,如果要使用,编译看左边,父类中没有,编译不通过,无法使用)
多态中的转型
为什么要学习多态的转型?
多态的弊端是不能使用子类的特有功能,而通过转型,我们就可以使用子类的特有功能
向上转型
向下转型
父类引用指向子类对象,我们称这个过程为向上转型,属于自动类型转换
向上转型后的父类引用变量只能调用它编译类型的方法,不能调用它运行时类型的方法。这时,我们就需要进行类型的强制转换,我们称之为向下转型
 1
 2
 3
 4
 5
 6
 7
 8
 9
10
11
12
13
14
15
16
17
18
19
20
21
22
23
24
25
26
27
28
29
30
31
32
33
34
35
36
37
38
39
public class Animal {
public void eat () {
System . out . println ( "动物吃东西" );
}
}
public class Cat extends Animal {
@Override
public void eat () {
System . out . println ( "猫吃鱼" );
}
public void playGame () {
System . out . println ( "猫捉迷藏" );
}
}
public class AnimalDemo {
public static void main ( string [] args ) {
//向上转型
Animal a = new Cat ();
a . eat ();
//a.playGame(); 报错
//我现在想使用playGame()怎么办
//①创建Cat对象
Cat c = new Cat ();
c . eat ();
c . playGame ();
//②向下转型
Cat c = ( Cat ) a ; //父类引用转为子类对象
c . eat ();
c . playGame ();
}
}
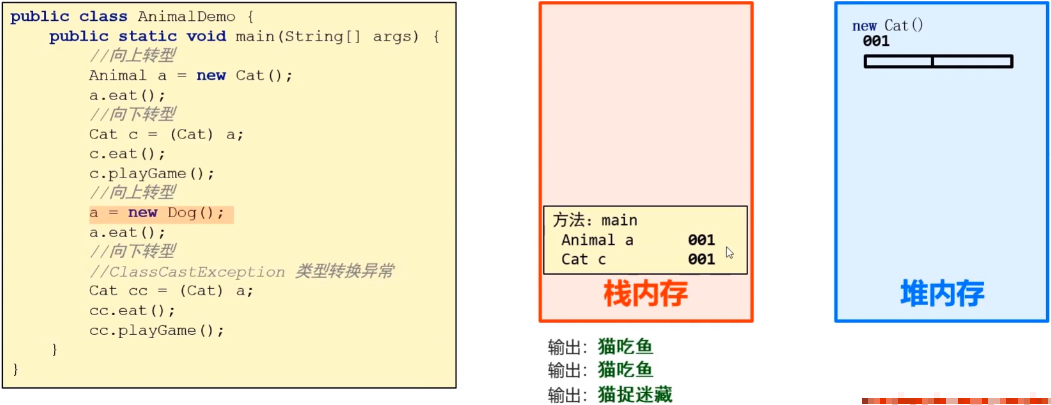
多态转型内存图解
(图2)
(图3)
(图4)
为了防止在向下转型时,出现类型转换异常,在向下转型中使用 instanceof,加入 instanceof 进行判断
instanceof 是二元运算符,左边是对象,右边是类;当左边对象是右面的类或右面子类所创建的对象时,返回 true;否则,返回 false。
案例(猫和狗多态版)
需求:请采用多态的思想实现猫和狗的案例,并在测试类中进行测试
 1
 2
 3
 4
 5
 6
 7
 8
 9
10
11
12
13
14
15
16
17
18
19
20
21
22
23
24
25
26
27
28
29
30
31
32
33
34
35
36
37
38
39
40
41
42
43
44
45
46
47
48
49
50
51
52
53
54
55
56
57
58
59
60
61
62
public class Animal {
private String name ;
private int age ;
public Animal () {
}
public Animal ( String name , int age ) {
this . name name ;
this . age age ;
}
public void eat () {
System . oUt . println ( "动物吃东西" ) ;
}
//set/get......
}
public class Cat extends Animal {
public cat (){
}
public Cat ( String name , int age ) {
super ( name , age );
}
@Override
public void eat () {
System . out . println ( "猫吃鱼" );
}
}
public class Dog extends Animal {
public Dog (){
}
public Dog ( String name , int age ) {
super ( name , age );
}
@Override
public void eat (){
System . out . println ( "狗吃骨头" );
}
}
public class AnimalDemo {
public static void main ( String [] args ) {
//按照多态的方式创建对象并进行测试
Animal a = new Cat ();
a . setName ( "加菲" );
a . setAge ( 5 );
System . out . println ( a . getName () + "," + a . getAge ());
a . eat ();
a = new Cat ( "加菲" , 5 );
System . out . println ( a . getName () + "," + a . getAge ());
a . eat ();
}
}
抽象类概述
在 java 中,一个没有方法体的方法应该定义为抽象方法,而类中如果有抽象方法,该类必须定义为抽象类
1
2
3
public abstract class Animal {
public abstract void eat ();
}
抽象类特点
 1
 2
 3
 4
 5
 6
 7
 8
 9
10
11
12
13
14
15
16
17
18
19
20
21
22
23
24
25
//抽象类
public abstract class Animal {
//抽象方法
public abstract void eat ();
public void sleep () {
System . out . println ( "睡觉" );
}
}
public class Cat extends Animal {
@Override
public void eat () {
System . out . println ( "猫吃鱼" );
}
}
public class AnimalDemo {
public static void main ( String [] args ) {
Animal a = new Cat (); //抽象类多态
a . eat ();
a . sleep (); //sleep()通过继承得到的
}
}
(1) 抽象类和抽象方法必须使用 abstract 关键字修饰
public abstract class 类名{ }
public abstract void eat( );
(2) 抽象类中不一定有抽象方法,有抽象方法的类一定是抽象类
(3) 抽象类不能实例化,即不能用 new 来实例化抽象类(即不能直接用抽象类创建对象)
抽象类如何实例化呢?参照多态的方式,通过子类对象实例化,这叫抽象类多态
(4) 抽象类的子类
要么重写抽象类中的所有抽象方法
要么本身也是抽象类 (如果不将继承的抽象方法重写,那么自己本身也是抽象类)
抽象类通过多态使用
抽象类只能用来被继承
抽象类成员特点
 1
 2
 3
 4
 5
 6
 7
 8
 9
10
11
12
13
14
15
16
17
18
19
20
21
22
23
24
25
26
27
28
29
30
31
32
33
34
35
36
37
38
//抽象类
public abstract class Animal {
private int age = 20 ;
private final String name = "动物" ;
public Animal () {
}
public Animal ( int age ) {
this . age = age ;
}
public void show () {
age = 40 ;
System . out . println ( age );
//name = "老虎";报错 name是常量不能被修改
System . out . println ( name );
}
public abstract void eat ();
}
public class Cat extends Animal {
@Override
public void eat () {
System . out . println ( "猫吃鱼" );
}
}
public class AnimalDemo {
public static void main ( String [] args ) {
Animal a = new Cat (); //抽象类多态
a . eat ();
a . show (); //通过继承得到的 40 动物
}
}
(1) 成员变量
(2) 构造方法
有构造方法,但是不能实例化
那么,构造方法的作用是什么呢?用于子类访问父类数据的初始化
(3) 成员方法
可以有抽象方法:限定子类必须完成某些动作
也可以有非抽象方法:提高代码复用性
抽象类可以包含属性,方法,构造方法。但是构造方法不能用来 new 实例,只能用来被子类调用,用于子类访问父类数据的初始化
案例(猫和狗抽像类版)
需求:请采用抽象类的思想实现猫和狗的案例,并在测试类中进行测试
 1
 2
 3
 4
 5
 6
 7
 8
 9
10
11
12
13
14
15
16
17
18
19
20
21
22
23
24
25
26
27
28
29
30
31
32
33
34
35
36
37
38
39
40
41
42
43
44
45
46
public abstract class Animal {
private String name ;
private int age ;
public Animal () {
}
public Animal ( String name , int age ) {
this . name = name ;
this . age = age ;
}
public abstract void eat ();
//set/get......
}
public class Cat extends Animal {
public Cat () {
}
public Cat ( String name , int age ) {
super ( name , age );
}
@Override
public void eat () {
System . out . println ( "猫吃鱼" );
}
}
public class AnimalDemo {
public static void main ( String [] args ) {
//按照多态的方式创建对象并进行测试
Animal a = new Cat ();
a . setName ( "加菲" );
a . setAge ( 5 );
System . out . println ( a . getName () + "," + a . getAge ());
a . eat ();
a = new Cat ( "加菲" , 5 );
System . out . println ( a . getName () + "," + a . getAge ());
a . eat ();
}
}
接口概述
接口就是一种 公共的规范标准 ,只要符合规范标准,大家都可以通用
Java 中的接口更多的体现在 对行为的抽象
接口是类层次的一种结构
public class 类名
Public interface 接口名
父类 → 本质上是具有共同的内容
接口 → 本质上是提供功能(老鼠夹子和猫都具有抓老鼠的功能)
接口就是比 “抽象类” 还 “抽象” 的 “抽象类”,可以更加规范的对子类进行约束。全面地专业地实现了:规范和具体实现的分离 。
从接口的实现者角度看,接口定义了可以向外部提供的服务。
从接口的调用者角度看,接口定义了实现者能提供那些服务。
区别
普通类:具体实现
抽象类:具体实现,规范(抽象方法)
接口:规范!
声明格式 (JDK8以前)
(图5)
访问修饰符:只能是 public 或 默认
接口名:和类名采用相同命名机制
Extends:接口可以多继承
常量:接口中的属性只能是常量,总是 public static final 修饰。不写也是
方法:接口中的方法只能是:public abstract。省略的话,也是 public abstract
接口中没有构造方法,因为接口主要是扩展功能的,而没有具体存在,一个类如果没有父类,默认继承自 Object 类,实现类中无参构造方法的 super(),访问的是 Object 类中的无参构造方法,Public class A implemrnts B{} 相当于 Public class A extends Object implements B{}
(1) 子类通过 implements 来实现接口中的规范。
(2) 接口不能创建实例,但是可用于声明引用变量类型。
(3) 一个类实现了接口,必须实现接口中所有的方法,并且这些方法只能是 public 的。
(4) JDK1.8(不含8)之前,接口中只能包含静态常量、抽象方法,不能有普通属性、构造方法、普通方法。
(5) JDK1.8(含8)后,接口中包含普通的静态方法、默认方法(default)。
接口特点
 1
 2
 3
 4
 5
 6
 7
 8
 9
10
11
12
13
14
15
16
17
18
public interface Inter {
public abstract void show ();
}
public class InterImpl implments Inter {
@Override
public void show () {
System . out . println ( "show..." );
}
}
public class InterDemo {
public static void main ( String [] args ) {
Inter i = new InterImpl (); //接口的多态
i . show ();
}
}
1
2
public abstract class InterImpl implments Inter {
}
抽象类 InterImpl 可以实现接口,只不过到时候需要提供一个 InterImpl 的子类才能使用。
(1) 接口用关键字 interface 修饰
public interface 接口名
(2) 类实现接口用 implements 表示
public class 类名 implements 接口名
(3) 接口不能实例化
接口如何实例化呢?参照多态的方式,通过实现类对象实例化,这叫接口多态
多态的形式:具体类多态,抽象类多态,接口多态
多态的前提:有继承或者实现关系;有方法重写;有父(类/接口)引用指向(子/实现)类对象
(4) 接口的实现类
要么重写接口中的所有抽象方法
要么是抽象类
接口成员特点
 1
 2
 3
 4
 5
 6
 7
 8
 9
10
11
12
13
14
15
16
public interface Inter {
public int num = 10 ;
public final int num2 = 20 ;
public abstract void show ();
}
public class InterDemo {
public static void main ( String [] args ) {
Inter i = new InterImpl ();
System . out . println ( i . num ); //10
System . out . println ( i . num2 ); //20
//i.num = 40; 报错,默认前边加了一个final,被final修饰,不能修改
//i.num2 = 30; 报错,被final修饰,不能修改
}
}
 1
 2
 3
 4
 5
 6
 7
 8
 9
10
11
//public class InterImpl implements Inter{
public class InterImpl extends Object implements Inter {
public InterImpl () {
super ();
}
@Override
public abstract void show () {
System . out . println ( "show..." );
}
}
如果没有父类,则默认继承 Object,那么类中的构造方法里的 super() 调用的则是 Object 类的构造方法。
(1) 成员变量
只能是常量
默认修饰符:public static final
(2) 构造方法
没有,因为接口主要是扩展功能的,而没有具体存在
一个类如果没有父类,默认继承自 Object 类
(3) 成员方法
只能是抽象方法
默认修饰符:public abstract
类和接口关系
继承关系,只能单继承,但是可以多层继承
实现关系,可以单实现,也可以多实现,还可以在继承一个类的同时实现多个接口
继承关系可以单继承,也可以多继承 (接口之间可以多继承)
1
2
3
4
5
6
7
// 类和接口的关系
public class InterImpl extends Object implements Inter1 , Inter2 , Inter3 {
}
// 接口和接口的关系
public interface Inter3 extends Inter1 , Inter2 {
}
抽象类和接口的区别
(1) 成员区别
抽象类 变量,常量;有构造方法;有抽象方法,也有非抽象方法
接口 常量;抽象方法
(2) 关系区别
类与类 继承,单继承
类与接口 实现,可以单实现,也可以多实现
接口与接口 继承,单继承,多继承
(3) 设计理念区别
抽象类 对类抽象,包括属性、行为
接口 对行为抽象,主要是行为
对设计理念区别进行详细说明
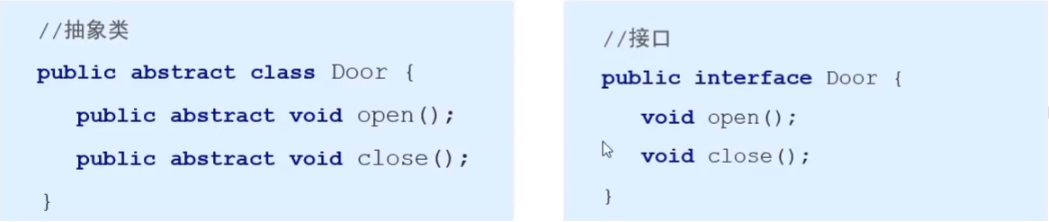
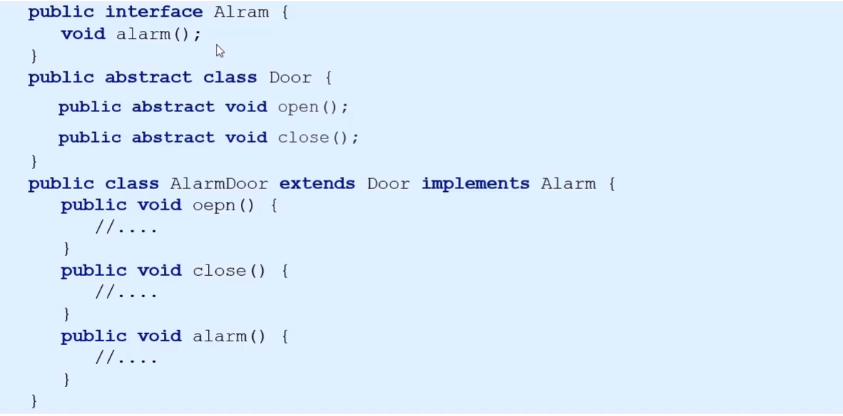
门和警报的例子
门:都有 open() 和 close() 两个动作,这个时候,我们可以分别使用抽象类和接口来定义这个抽象概念
(图6)
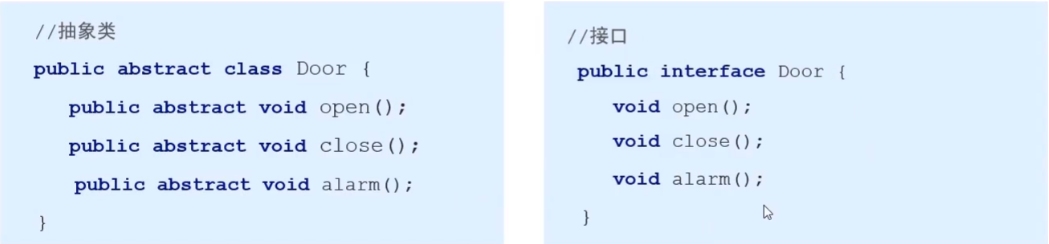
随着科技的发展,现在的门有了报警的功能,现在有两种方案,一种是都放在抽象类中,一种是都放在接口中
(图7)
如果都放在抽象类中,那么每个门都有报警的功能,这是不太现实的
如果都放在接口中,那么并不是每个东西都有开门、关门的功能,例如: 报警器
开门、关门属于门本身固有的行为,而报警属于延伸的行为
(图8)
抽象类是对事物的抽象,例如门
接口是对行为的抽象,例如警报
案例(木门和电动报警门综合案例)
需求:请采用面向对象的思想实现木门和电动报警门的案例,并在测试类中进行测试
(图9)
(图10)
分析
①木门
②电动报警门:
成员变量:宽,高,品牌
成员方法:开门,关门,报警
思路
①定义报警(Alarm)接口
②定义门(Door)抽象类
成员变量:宽,高,品牌
构造方法:无参,带参
成员方法:gt/set方法,开门,关门
③定义木门类(WoodDoor),继承门类
④定义电动报警门类(ElectricAlarmDoor),继承门类,实现报警接口
  1
  2
  3
  4
  5
  6
  7
  8
  9
 10
 11
 12
 13
 14
 15
 16
 17
 18
 19
 20
 21
 22
 23
 24
 25
 26
 27
 28
 29
 30
 31
 32
 33
 34
 35
 36
 37
 38
 39
 40
 41
 42
 43
 44
 45
 46
 47
 48
 49
 50
 51
 52
 53
 54
 55
 56
 57
 58
 59
 60
 61
 62
 63
 64
 65
 66
 67
 68
 69
 70
 71
 72
 73
 74
 75
 76
 77
 78
 79
 80
 81
 82
 83
 84
 85
 86
 87
 88
 89
 90
 91
 92
 93
 94
 95
 96
 97
 98
 99
100
101
102
103
104
105
106
107
108
109
110
111
112
113
114
115
116
117
118
119
120
/*
报警接口
*/
public interface Alarm {
void alarm ();
}
/*
抽象门类
*/
public abstract class Door {
//宽
private double width ;
//高
private double height ;
//品牌
private String brand ;
//开门
public abstract void open ();
//关门
public abstract void close ();
public Door () {
}
public Door ( double width , double height , String brand ) {
this . width = width ;
this . height = height ;
this . brand = brand ;
}
//set/get......
}
/*
木门
*/
public class WoodDoor extends Door {
@Override
public void open () {
System . out . println ( "手动开门" ) ;
}
@Override
public void close () {
System . out . println ( "手动关门" ) ;
}
public WoodDoor () {
}
public WoodDoor ( double width , double height , String brand ) {
super ( width , height , brand );
}
}
/*
电动报警门
*/
public class ElectricAlarmDoor extends Door implents Alarm {
public ElectricAlarmDoor () {
}
public ElectricAlarmDoor ( double width , double height , String brand ) {
super ( width , height , brand );
}
@Override
public void alarm () {
System . out . println ( "具有报警功能" ) ;
}
@Override
public void open () {
System . oUt . println ( "自动开门" ) ;
}
@Override
public void close () {
System . oUt . println ( "自动关门" ) ;
}
}
/*
测试类
*/
public class DoorDemo {
public static void main ( String [] args ) {
//木门
WoodDoor wd = new WoodDoor ();
wd . open ();
wd . close ();
//wd.alarm(); 报错,没有这个功能
//电动报警门
ElectricAlarmDoor ed = new ElectricAlarmDoor ();
ed . open ();
ed . close ();
ed . alarm ();
//多态
Door d = new WoodDoor ();
d . open ();
d . close ();
d = new ElectricAlarmDoor ();
d . open ();
d . close ();
//d.alarm(); 报错,因为门这个抽象类里没有报警的方法
Alarm a = new ElectricAlarmDoor ();
//a.open(); 报错,因为报警的接口中没有开门和关门的方法
//a.close(); 报错,因为报警的接口中没有开门和关门的方法
a . alarm ();
}
}
JD8 以后接口中新增的方法
接口的组成
常量:public static final
抽象方法:public abstract
默认方法 (Java 8)
静态方法 (Java 8)
私有方法 (Java 9)
默认方法
接口中默认方法的定义格式
概述:JDK8 之后才出现的方法,实现类可以重写,也可以不重写
格式:public default 返回值类型 方法名 (参数列表) {方法体}
范例:public default void show1( ) {方法体}
 1
 2
 3
 4
 5
 6
 7
 8
 9
10
11
12
13
14
15
16
public interface Inter {
public default void show1 () {
System . out . println ( "默认方法被调用" ) ;
}
}
public class InterImpl implements Inter {
}
public class InterDemo {
public static void main ( String [] args ) {
Inter i = new InterImpl ();
i . show1 ();
}
}
接口中默认方法的 注意事项 :Public 可以省略,default 不能省略
静态方法
接口中静态方法的定义格式
概述:JDK8 之后才出现的方法,只能通过 接口名.方法名() 调用
格式:public static 返回值类型 方法名 (参数列表){方法体}
范例:public static void show2( ){方法体}
 1
 2
 3
 4
 5
 6
 7
 8
 9
10
11
12
13
14
15
16
17
18
public interface Inter {
public static void show2 () {
System . out . println ( "静态方法被调用" ) ;
}
}
public class InterImpl implements Inter {
}
public class InterDemo {
public static void main ( String [] args ) {
Inter i = new InterImpl ();
//i.show2(); 报错,不能通过对象.方法名调用
//InterImpl.show2(); 报错,不能通过实现类.方法名调用
Inter . show2 ();
}
}
接口中静态方法的 注意事项 :
静态方法只能通过接口调用,不能通过实现类名或者对象名调用
Public 可以省略,static 不能省略
私有方法
私有方法 (就是为了给接口中的默认方法和静态方法使用的,外界是不能访问的)
概述:JDK9 之后才出现的方法
接口中私有方法的定义格式
格式1:private 返回值类型 方法名 (参数列表){ 方法体}
范例1:private void show3( ){ }
格式2:private static 返回值类型 方法名 (参数列表){ 方法体}
范例2:private static void show4( ){ }
 1
 2
 3
 4
 5
 6
 7
 8
 9
10
11
12
13
14
15
16
17
18
19
20
21
22
23
24
25
26
27
28
29
30
31
32
33
34
35
36
37
public interface Inter {
//默认方法
public default void show1 () {
System . out . println ( "默认方法被调用" );
show3 ();
show4 ();
}
//静态方法
public static void show2 () {
System . out . println ( "静态方法被调用" ) ;
//show3(); 报错,静态的方法只能访问静态的方法
show4 ();
}
//私有方法
private void show3 () {
System . out . println ( "私有方法" ) ;
}
//静态私有方法
private static void show4 () {
System . out . println ( "静态私有方法" ) ;
}
}
public class InterImpl implements Inter {
}
public class InterDemo {
public static void main ( String [] args ) {
Inter i = new InterImpl ();
//i.show3(); 报错,因为私有方法在外界是不能访问的
//i.show4(); 报错,因为私有方法在外界是不能访问的
}
}
接口中私有方法的 注意事项 :
默认方法可以调用 私有 的静态方法和非静态方法
静态方法只能调用私有的静态方法
函数式接口概念
函数式接口(Functional Interface)就是一个 有且仅有一个抽象方法,但是可以有多个非抽象方法 的接口。注解 @FunctionalInterface 可以检测接口是否是一个函数式接口。(在合作开发中,避免同事修改此接口造成错误)
 1
 2
 3
 4
 5
 6
 7
 8
 9
10
11
12
13
14
15
16
17
18
19
20
21
22
23
24
25
26
27
/*
函数式接口
1.interface接口,其次有且只能有一个待实现的抽象方法,允许有default默认方法的存在
2.@FunctionalInterface 编译期检测是否符合函数式接口的规范,类似于@Override
3.建议加上注解@FunctionalInterface, 以避免同事接口改造升级,而带来的简化出现问题
*/
@FunctionalInterface
interface MyFunctionalInterfacel {
void test ();
//void a();
default void b (){};
}
-----------------------------------------
class Test {
public void method ( MyFunctionalInterfacel my ) {
my . test ();
}
}
-----------------------------------------
public class FunctionalDemo1 {
public static void main ( String [] args ) {
Test test = new Test ();
test . method (() -> System . out . println ( "Hello!" )); //匿名内部类,重写MyFunctionalInterfacel中的抽象方法
}
}
函数定义及使用
定义一个函数式接口:
1
2
3
4
5
//问候
@FunctionalInterface
public interface GreetingService {
void sayMessage ();
}
定义此函数式接口的实现类:
1
2
3
4
5
6
7
public class GreetingServiceImpl implements GreetingService {
@Override
public void sayMessage () {
System . out . println ( "say hello!" );
}
}
函数式接口一般作为方法的参数和返回值类型:
 1
 2
 3
 4
 5
 6
 7
 8
 9
10
11
12
13
14
15
16
17
18
19
public class Demo {
//定义一个方法,参数使用函数式接口GreetingService
public static void show ( GreetingService greetingService ) {
greetingService . sayMessage ();
}
public static void main ( String [] args ) {
//调用show方法,方法的参数是一个接口,所以可以传递接口的实现类
show ( new GreetingServiceImpl ());
//调用show方法,方法的参数是一个接口,所以可以传递接口的匿名内都类
show ( new GreetingService (){
@Override
public void sayMessage (){
System . out . println ( "使用匿名内类重写接口中的抽象方法" );
}
});
}
}
Lambda+functionInterface
Lambda + functionInterface: 具有延迟加载的效果
 1
 2
 3
 4
 5
 6
 7
 8
 9
10
11
12
13
14
15
16
17
18
19
20
21
22
23
24
25
26
27
28
29
30
31
32
33
34
35
36
37
38
39
40
41
42
43
44
45
46
47
48
49
50
51
/*
通过lambda + Functional Interface的好处?
1.简化代码,使代码更加简洁
2.延迟加载效果
需求:日志记录(时间+异常类型+异常信息行数) 日志级别达到3才需要记录输出
*/
@FunctionalInterface
interface MyFunctionalInterface2 {
//记录日志的操作
void test ();
}
----------------------------------------
public class FunctionalDemo2 {
/**
* 日志记录器
* @param leveL 日志级别
* @param msg 日志信息
*/
public static void testLog ( int level , string msg ){
if ( level == 3 ){
System . out . println ( msg );
}
}
/**
* 带有函数式接口FunctionalInterface的,日志记录器
* @param leveL 日志级别
* @param my
*/
public static void testLogAndFunctionalInterface ( int level , MyFunctionalInterface2 my ){
if ( level == 3 ){
my . test ();
}
}
public static void main ( string [] args ){
//日志记录(时间+异常类型+异常信息行数)
LocalDateTime now = LocalDateTime . now ();
String type = "NullPointerException" ;
String line = "Bank.java 112" ;
//无论是否符合日志等级,都将会先拼接好日志信息
testLog ( 1 , now + "," + type + "," + line );
//等级一旦不符合,不会进行日志信息的拼接操作
testLogAndFunctionalInterface ( 2 , () -> System . out . println ( now + "," + type + "," + line ));
}
}
使用lambda表达式的好处
优势:
有些场景的代码执行后,结果不一定会被使用,从而造成性能浪费。而 Lambda 表达式是延迟执行的,这正好可以作为解决方案,提升性能。
例如:性能浪费的日志案例
PS: 日志可以帮助我们快速的定位问题,记录程序运行过程中的情况,以便项目的监控和优化。
一种典型的场景就是对参数进行有条件使用,例如对日志消息进行拼接后,在满足条件的情况下进行打印输出:
 1
 2
 3
 4
 5
 6
 7
 8
 9
10
11
12
13
14
15
16
public class Test {
public static void main ( string [] args ) {
String msgA = "hello" ;
String msgB = "world" ;
String msgC = "java" ;
showLog ( 1 , msgA + msgB + msgc );
}
private static void showLog ( int level , String msg ) {
//当日志级别为1时,打印日志
if ( level == 1 ) {
System . out . println ( msg );
}
}
}
这段代码存在问题:无论级别是否满足要求,作为 showLog 方法的第二个参数,三个字符串一定会首先被拼接并传入方法内,然后才会进行级别判断。如果级别不符合要求,那么字符串的拼接操作就白做了,存在性能浪费。
使用 lambda 必然先定义一个函数式接口:
1
2
3
4
@FunctionalInterface
interface MessageBuilder {
String buildMessage ();
}
对 showLog 方法进行改造
 1
 2
 3
 4
 5
 6
 7
 8
 9
10
11
12
13
14
15
16
17
18
19
20
21
22
public class Test {
public static void main ( string [] args ) {
String msgA = "hello" ;
String msgB = "world" ;
String msgC = "java" ;
//lambda实现显示日志
showLogLambda ( 1 ,() -> msgA + msgB + msgC );
//证明lambda表达式的延迟执行
showLogLambda ( 1 , () -> {
System . out . printIn ( "Lambda执行!" );
return msgA + msgB + msgC ;
});
}
private static void showLogLambda ( int level , MessageBuilder builder ) {
if ( level == 1 ){
System . out . println ( builder . buildMessage ());
}
}
}
这样一来,只有当级别满足要求的时候,才会进行三个字符串的拼接;否则三个字符串将不会进行拼接。
常用的函数式接口
要使用 lambda 表达式,我们就要创建一个函数式接口,那每次用 lambda 表达式的时候岂不是很麻烦,这时候,java 给我们内置了四大核心函数式接口。
函数式接口
参数类型
返回类型
用途
Supplier 接口,供给型接口
无
T
返回类型为T的对象,T get()
Consumer 接口,消费型接口
T
void
对类型为T的对象应用操作,void accept(T t)
Function<T,R> 接口,函数型接口
T
R
根据类型T的参数获取类型R的结果,R apply(T t)
Predicate 接口,断定型接口
T
boolean
用于条件判断的场景,boolean test(T t)
Supplier接口
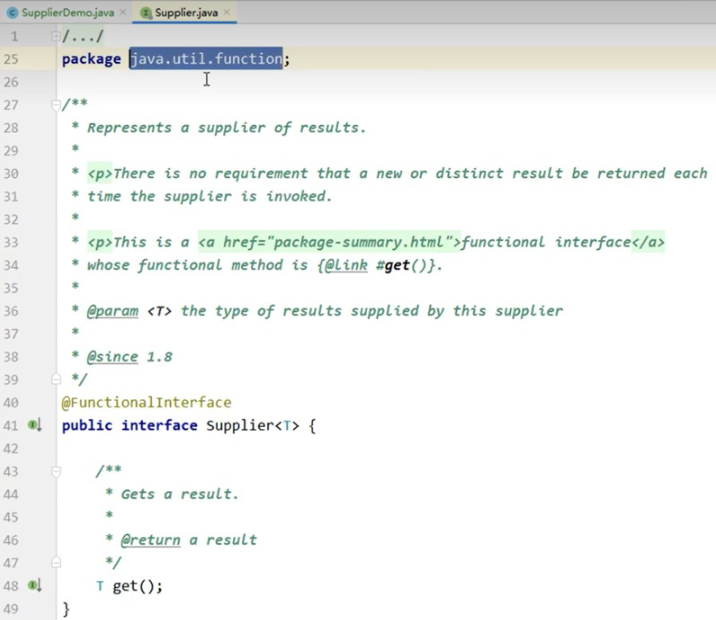
java.util.function.Supplier 接口仅包含一个无参的方法:T get()。用来获取一个泛型参数指定类型的对象数据。由于这是一个函数式接口,这也就意味着对应的 Lambda 表达式需要 “对外提供” 一个符合泛型类型的对象数据。
抽象方法 get
 1
 2
 3
 4
 5
 6
 7
 8
 9
10
11
public class TestSupplier {
private static String getString ( Supplier < String > function ) {
return function . get ();
}
public static void main ( String [] args ) {
String msgA = "Hello" ;
String msgB = "World" ;
System . out . println ( getstring (() -> msgA + msgB ));
}
}
源码
(图11)
样例
供给型,传什么类型,返回什么类型的数据
 1
 2
 3
 4
 5
 6
 7
 8
 9
10
11
12
13
14
15
16
17
18
19
20
21
22
23
24
25
26
27
28
/**
* supplier<T> 函数式接口 @FunctionalInterface
* 1.供给型
* 2.java.util.function JDK1.8
* 3.T get();提供一个与泛型一致的数据
*/
public class SupplierDemo {
public static String testGet ( Supplier < string > supplier ) {
string s = supplier . get ();
return s ;
}
public static void main ( String [] args ) {
String str1 = testGet ( new Supplier < string > () {
@Override
public String get (){
String string = "abc" ;
return string . toUppercase ();
}
});
System . out . println ( "str1 =" + str1 ); //ABC
System . out . println ( "-----Lambda简化----" );
String str2 = testGet (() -> "AAA" . toLowercase ()); //aaa
System . out . println ( str2 );
}
}
练习
求数组元素最大值,使用 Supplier 接口作为方法参数类型,通过 Lambda 表达式求出 int 数组中的最大值。
 1
 2
 3
 4
 5
 6
 7
 8
 9
10
11
12
13
14
15
16
17
18
19
public class MaxValue {
public static int getMax ( Supplier < Integer > s ) {
return s . get ();
}
private MaxValue () {
}
}
public class TestOne {
public static void main ( String [] args ) {
int [] arr = { 7 , 4 , 9 , 2 , 6 };
int max = MaxValue . getMax (() -> {
Arrays . sort ( arr );
return arr [ arr . length - 1 ] ;
});
System . out . println ( "最大值:" + max );
}
}
Consumer接口
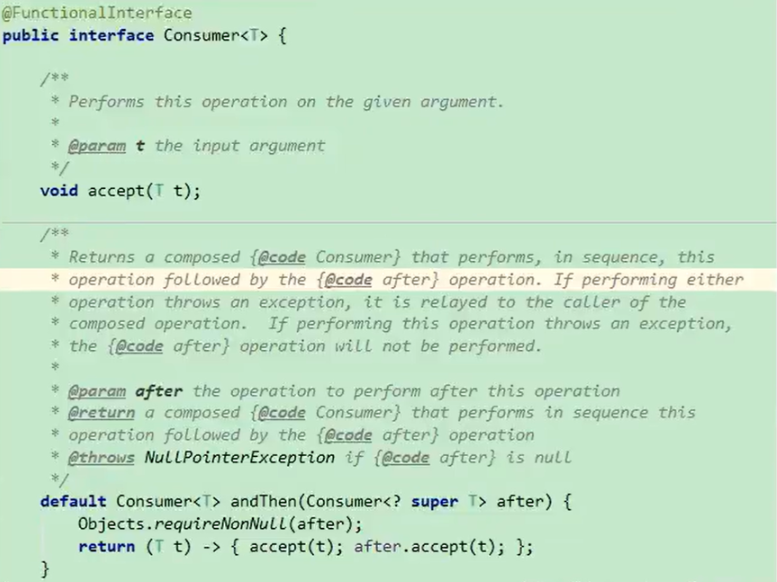
java.util.function.Consumer 接口则正好与 Supplier 接口相反,它不是生产一个数据,而是消费一个数据,其数据类型由泛型决定。
Consumer 提供了 accept(T t) 的抽象方法,和 andThen 的默认方法,查看源码如下:
(图12)
Accept()
 1
 2
 3
 4
 5
 6
 7
 8
 9
10
11
12
13
14
15
16
17
18
19
20
21
22
23
24
25
26
27
28
29
30
31
/**
* Consumer<T>
* 1.消费型 函数式接口 @FunctionalInterface
* 2.java.util.function JDK1.8
* 3.void accept(T t); 需要传递一个与泛型类型一致的数据,没有返回值
* Consumer<T> andThen(Consumer<? super T> after)
* 4.需要传递一个与泛型类理一致的数据
*/
public class ConsumerDemo {
public static void testAccept ( Consumer < Integer > consumer , Integer i ) {
consumer . accept ( i );
}
public static void main ( String [] args ) {
system . out . println ( "-----------void accept(T t)----------" );
testAccept ( new Consumer < Integer > (){
@override
public void accept ( Integer integer ){
integer += 100 ;
System . out . println ( "integer = " + integer ); //110
}
}, 10 );
System . out . println ( "-----void accept(T t)简化------" ) ;
testAccept ( i -> {
i *= 10 ;
System . out . println ( "i =" + i ); //1000
}, 100 );
}
}
Andthen()
 1
 2
 3
 4
 5
 6
 7
 8
 9
10
11
12
13
14
15
16
17
18
19
20
public class ConsumerDemo {
public static void testAndThen ( Consumer < Integer > consumer1 , Consumer < Integer > consumer2 , Integer i ) {
consumer1 . andThen ( consumer2 ). accept ( i );
}
public static void main ( String [] args ) {
System . out . println ( "----------consumer<T> andThen(consumer<? super T> after)-----------" );
testAndThen (
i1 -> {
i1 *= 200 ;
System . out . println ( "il = " + i1 ); //20 * 200 = 4000
},
i2 -> {
i2 += 200 ;
System . out . println ( "i2 =" + i2 ); //4000 + 200 = 4200
},
20 );
}
}
详解
 1
 2
 3
 4
 5
 6
 7
 8
 9
10
11
12
13
14
15
System . out . println ( "----------andThen -----------" )
testAndThen (
new Consumer < Integer > () {
@override
public void accept ( Integerinteger ) {
}
},
new Consumer < Integer > () {
@override
public void accept ( Integerinteger ) {
}
},
30 );
我的理解是: 就相当于两个 accept()
Andthen() 其实就是合并操作,传进来的值多用几次
consumer1.andThen(consumer2).accept(i); 先调用自己本身的 accept(),再调用第二个参数的 accept()
首先,consumer1 对 i 进行处理。
然后,consumer2 对 consumer1 处理后的结果进行进一步处理。
consumer1.andThen(consumer2).accept(i); 这行代码的意思是:首先执行 consumer1 对 i 的处理,然后执行 consumer2 对 consumer1 的处理结果进行处理。
(图13)
Function<T,R>接口
java.util.function.Function 接口用来根据一个类型的数据得到另一个类型的数据,前者称为前置条件,后者称为后置条件。
抽象方法apply()
Function<T, R> 接口中最主要的抽象方法为:R apply(T t),根据类型 T 的参数获取类型 R 的结果。
 1
 2
 3
 4
 5
 6
 7
 8
 9
10
11
12
13
//将String类型转换为Integer类型
public class TestFunction {
public static void main ( String [] args ) {
method ( s -> Integer . parseInt ( s ));
}
private static Integer method ( Function < String , Integer > function ) {
int num = function . apply ( "10" );
System . out . println ( num );
return num ;
}
}
样例Apply()方法
 1
 2
 3
 4
 5
 6
 7
 8
 9
10
11
12
13
14
15
16
17
18
19
20
21
/**
* Function<T,R>
* 1.函数型 函数式接口 @FunctionalInterface
* 2.java.util.function JDK1.8
* 3.R apply(T t);传入一个与泛型一致的数据类型,并返回另外一个与泛型一致的数据
* default <V> Function<T, V> andThen(Function<? super R, ? extends V>after)
* 4.将T类型,转成R类型,并且返回
*/
public class FunctionDemo {
public static Integer testApply ( Function < String , Integer > function , string str ) {
Integer integer = function . apply ( str );
return integer ;
}
public static void main ( string [] args ) {
Integer i1 = testApply ( str -> Integer . parseInt ( str )), "120" );
System . out . println ( i1 );
}
}
AndThen()方法: 链式调用
 1
 2
 3
 4
 5
 6
 7
 8
 9
10
//Integer -> string -> Double
public static Double testAndThen ( Function < Integer , string > function1 , Function < string , Double > function2 , Integer i ) {
Double d = function1 . andThen ( function2 ). apply ( i );
return d ;
}
public static void main ( String [] args ) {
Double d = testAndThen ( i -> i + "" , s -> Double . paseDoule ( s ), 10 );
System . out . println ( d );
}
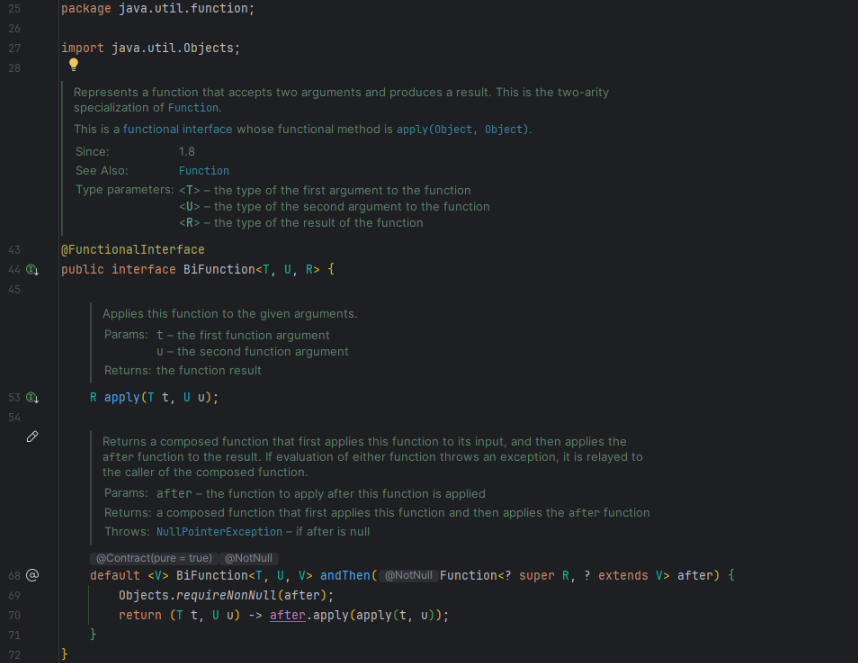
练习: BigFunction() :给泛型T和U,返回泛型R
(图14)
biFunction实战
 1
 2
 3
 4
 5
 6
 7
 8
 9
10
11
12
13
14
15
//工具类,构造方法私有,只能通过 类名.方法名 调用,不能通过创建对象调用
public class MaxValue {
public static String add ( BiFunction < Integer , Integer , String > bf , Integer a , Integer b ) {
return bf . apply ( a , b );
}
private MaxValue () {
}
}
public static void main ( String [] args ) {
String add = MaxValue . add (( a , b ) -> {
return String . valueOf ( a + b );
}, 5 , 7 );
}
BiFunction 在 Map.merge() 中的应用
 1
 2
 3
 4
 5
 6
 7
 8
 9
10
11
12
13
14
15
16
17
18
19
20
21
22
23
24
25
public class TestMerge {
public static void main ( String [] args ) {
List < Student > studentList = Arrays . asList (
new Student ( "张三" , "语文" , 70 ),
new Student ( "张三" , "数学" , 70 ),
new Student ( "张三" , "英语" , 65 ),
new Student ( "李四" , "语文" , 65 ),
new Student ( "李四" , "数学" , 65 ),
new Student ( "李四" , "英语" , 65 ),
new Student ( "王五" , "语文" , 65 ),
new Student ( "王五" , "数学" , 65 ),
new Student ( "王五" , "英语" , 65 )
);
Map < String , Integer > map = new HashMap <> ();
studentList . stream (). forEach ( stu -> map . merge (
stu . getName (),
stu . getScore (),
( oldValue , newValue ) -> oldValue + newValue ));
System . out . println ( map );
}
}
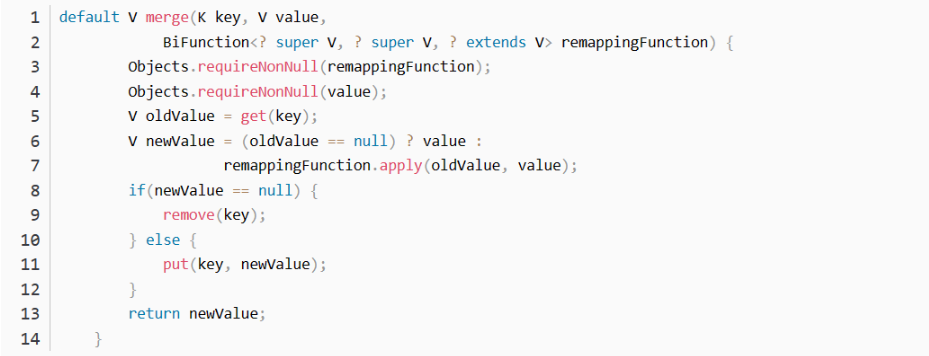
Map.merge()源码分析
(图15)
merge(K key, V value, BiFunction<? super V,? super V,? extends V> remappingFunction)
key:map 的 key
value:使用者传入的值
remappingFunction:BiFunction 函数式接口
情况
行为
key 不存在
插入 (key, value)
key 存在
执行 remappingFunction(oldValue, value) 并更新值
remappingFunction 返回 null
删除该 key
1
2
3
4
5
6
7
Map < String , Integer > map = new HashMap <> ();
map . put ( "a" , 10 );
// 想要删除 key "a",可以通过 merge 返回 null 实现
map . merge ( "a" , 0 , ( oldValue , newValue ) -> null );
System . out . println ( map ); // 输出 : {}
在这个例子中:
"a" 已经存在,值是 10调用 merge("a", 0, ...),执行 BiFunction (oldValue=10, newValue=0)
返回 null,说明要删除该 key
结果 map 变为空
predicate接口
有时候我们需要对某种类型的数据进行判断,从而得到一个 boolean 值结果。这时可以使用 java.util.function.Predicate 接☐。
(图16)
抽象方法test
Predicate 接口中包含一个抽象方法:boolean test(T t)
用于条件判断的场景:
 1
 2
 3
 4
 5
 6
 7
 8
 9
10
public class TestPredicate {
public static void main ( String [] args ) {
method ( s -> s . length () > 5 );
}
private static void method ( Predicate < String > predicate ) {
boolean b = predicate . test ( "Helloworld" );
System . out . printIn ( "字符串很长?" + b );
}
}
样例
 1
 2
 3
 4
 5
 6
 7
 8
 9
10
11
12
13
14
15
16
public class PredicateDemo {
//判断条件是否成立返回布尔类型值
public static boolean test ( Predicate < string > predicate , String str ) {
boolean flag = predicate . test ( str );
return flag ;
}
public static void main ( String [] args ) {
//判断字符串长度是否大于5
boolean flag1 = test ( a -> a . length () > 5 , "abcdef" );
boolean flag2 = test ( a -> a . length () > 5 , "cde" );
System . out . println ( "flag1 = " + flag1 );
System . out . println ( "flag2 = " + flag2 );
}
}
与、或、非 (and、or、negate)
 1
 2
 3
 4
 5
 6
 7
 8
 9
10
11
12
13
14
15
16
17
18
19
20
21
22
23
24
25
26
27
28
29
30
31
//与
public static boolean testAnd ( Predicate < string > predicate1 , Predicate < string > predicate2 , string str ) {
boolean flag = predicate1 . and ( predicate2 ). test ( str );
return flag ;
}
//或
public static boolean testor ( Predicate < string > predicate1 , Predicate < string > predicate2 , string str ) {
boolean flag = predicate1 . or ( predicate2 ). test ( str );
return flag ;
}
//非
public static boolean testNegate ( Predicate < string > predicate , string str ) {
boolean flag = predicate . negate (). test ( str );
return flag ;
}
public static void main ( String [] args ) {
//传入字符串,既包含字母a,又包含字母c
boolean flag3 = testAnd ( a -> a . contains ( "a" ), b -> b . contains ( "c" ), "abbb" ); //false
System . out . println ( flag3 );
//传入字符串,包含字母a,或者包含字母c
boolean flag4 = testOr ( a -> a . contains ( "a" ), b -> b . contains ( "c" ), "abbb" ); //true
System . out . println ( flag4 );
//判断字符串长度是否大于5
boolean flag5 = testNegate ( a -> a . length () > 5 , "abcdefg" ); //false
System . out . println ( flag5 );
}
Comparator接口
compare(Object o1, Object o2)
equals(Object obj)
int compare(T o1, T o2)
用于比较两个对象 o1 和 o2 的大小
具体来说,compare(Object o1, Object o2) 方法返回一个整数值:
如果 o1 小于 o2,则返回负整数;
如果 o1 等于 o2,则返回零;
如果 o1 大于 o2,则返回正整数。
boolean equals(Object obj)
用于比较两个 Comparator 对象是否相等。
如果两个 Comparator 对象相等,则返回 true;否则返回 false。
补充
1
2
3
4
5
Integer . compare ( a , b )
public static int compare ( int x , int y ) {
return ( x < y ) ? - 1 : (( x == y ) ? 0 : 1 );
}
方法引用
"::" 方法引用,在 JDK1.8 版本后和 lambda 表达式配套使用
当要传递给 Lambda 体的操作,已经有实现的方法了,可以使用方法引用! 方法引用可以看做是 Lambda 表达式深层次的表达。换句话说,方法引用就是 Lambda 表达式,也就是函数式接口的一个实例,通过方法的名字来指向一个方法,可以认为是 Lambda 表达式的一个语法糖。
要求:实现接口的抽象方法的参数列表和返回值类型,必须与方法引用的方法的参数列表和返回值类型保持一致!
格式:使用操作符 “::” 将类(或对象)与方法名分隔开来。
如下三种主要使用情况:
对象::实例方法名 (非静态方法也叫实例方法)
类::静态方法名
类::实例方法名 (非静态方法)
(1) 使用情境:当要传递给 lambda 体的操作,已经有实现的方法了,可以使用方法引用!
(2) 方法引用,本质上就是 Lambda 表达式,而 lambda 表达式作为函数式接口的实例。所以方法引用,也是函数式接口的实例。
(3) 使用格式:类(或对象) :: 方法名
(4) 方法引用使用的要求:要求 接口中 的抽象方法的形参列表和返回值类型与 方法引用 的方法的形参列表和返回值类型相同!
情况一:对象::实例方法
样例一
 1
 2
 3
 4
 5
 6
 7
 8
 9
10
11
//Consumer中的void accept(T t)
//Printstream中的void println(T t) 指的是System.out.println()
public void test1 () {
Consumer < string > con1 = str -> System . out . println ( str );
con1 . accept ( "北京" );
Printstream ps = System . out ; //println是System.out对象的方法
Consumer < string > con2 = ps :: println ;
con2 . accept ( "北京" );
}
1
2
Consumer < string > con1 = str -> System . out . println ( str );
con1 . accept ( "北京" );
Consumer<string> con1 = str -> System.out.println(str);
相当于
1
2
3
4
5
6
new Consumer < String > (){
@override
public void accept ( String str ){
System . out . println ( str );
}
}
也就是匿名内部类对象,可以理解为接口多态,左边是接口,右边是实现类,父类引用指向子类对象,经过 lambda 简化就成了 Consumer<string> con1 = str -> System.out.println(str);,得到对象 con1,调用对象中的方法并传入参数 con1.accept("北京");
1
2
3
Printstream ps = System . out ; //println是System.out对象的方法
Consumer < string > con2 = ps :: println ;
con2 . accept ( "北京" );
通过使用 :: 操作符,我们告诉 Java 我们想要引用 PrintStream 类中的 println 方法。然后,我们将这个方法引用赋值给 con2 变量。
当调用 con2.accept("北京") 时,实际上是调用了 println 方法,并将字符串 "北京" 作为参数传递给它。因为 println 方法在 PrintStream 类中已经定义,所以不需要我们编写新的函数逻辑。这就是为什么你可以将 ps::println 理解为 “使用现有方法”。
样例二
 1
 2
 3
 4
 5
 6
 7
 8
 9
10
11
12
//Supplier中的T get()
//EmpLoyee中的string getName()
public void test2 (){
Employee emp = new Employee ( 1001 , "Tom" , 23 , 5600 );
Supplier < String > sup1 = () -> emp . getName ();
System . out . println ( sup1 . get ());
Supplier < string > sup2 = emp :: getName ();
System . out . println ( sup2 . get ());
}
情况二:类::静态方法
样例一
 1
 2
 3
 4
 5
 6
 7
 8
 9
10
//Comparator中的int compare(T t1,T t2)
//Integer中的int compare(T t1,T t2)
public void test3 () {
Comparator < Integer > com1 = ( t1 , t2 ) -> Integer . compare ( t1 , t2 );
System . out . println ( com1 . compare ( 12 , 21 ));
Comparator < Integer > com2 = Integer :: compare ;
System . out . println ( com2 . compare ( 12 , 21 ));
}
因为 compare 方法已经存在于 Integer 类中,并且它的签名(即参数类型和返回类型)与 Comparator<Integer> 接口的 compare 方法签名兼容,所以你可以直接使用方法引用来创建 Comparator<Integer> 的实例。
当你写 Comparator<Integer> com2 = Integer::compare; 时,你实际上是在告诉编译器:“我想要一个Comparator,它的compare方法应该直接调用Integer类的compare方法” 。编译器会为你处理所有的细节,生成相应的 Lambda 表达式。
样例二
 1
 2
 3
 4
 5
 6
 7
 8
 9
10
11
//Function中的R apply(T t)
//Math中的Long round(Double d)
public void test4 () {
Function < Double , Long > func1 = d -> Math . round ( d );
System . out . println ( func1 . apply ( 12 . 3 ));
Function < Double , Long > func2 = Math :: round ;
System . out . println ( func2 . apply ( 12 . 3 ));
}
情况三:类::实例方法 (内部相当于对象::实例方法)
样例一
 1
 2
 3
 4
 5
 6
 7
 8
 9
10
//Comparator中的int comapre(T t1,T t2)
//String中的int t1.compareTo(t2)
public void test5 () {
Comparator < String > com1 = ( s1 , s2 ) -> s1 . compareTo ( s2 );
System . out . printin ( com1 . compare ( "abc" , "abd" ));
Comparator < string > com2 = String :: compareTo ;
System . out . println ( com2 . compare ( "abd" , "abm" ));
}
样例二
 1
 2
 3
 4
 5
 6
 7
 8
 9
10
//BiPredicate中的boolean test(T t1, T t2);
//String中的boolean t1.equals(t2)
public void test6 () {
BiPredicate < String , String > pre1 = ( s1 , s2 ) -> s1 . equals ( s2 );
System . out . println ( pre1 . test ( "abc" , "abc" ));
BiPredicate < String , String > pre2 = String :: equals ;
System . out . println ( pre2 . test ( "abc" , "abc" ));
}
为什么不直接使用 equals 方法,为什么要大费周章的使用方法引用呢?
代码复用和抽象 :当你需要多次执行相同的比较逻辑时,使用方法引用可以将这个逻辑抽象出来,并在多个地方重复使用。这样可以减少重复的代码,并提高代码的可读性和可维护性。作为参数传递 :有时,你可能需要将一个比较逻辑作为参数传递给其他方法或函数。例如,某些集合框架的方法(如 Collections2.filter 来自 Google 的 Guava 库)接受一个谓词(Predicate)作为参数,以便对集合进行过滤。在这种情况下,使用方法引用可以方便地传递比较逻辑。延迟执行和条件组合 :使用函数式接口和方法引用,你可以更容易地创建条件组合(例如,使用 Predicate.and、Predicate.or 等),或者延迟条件的执行,直到真正需要的时候。更清晰的意图表达 :在某些情况下,使用方法引用可以使代码的意图更加清晰。特别是当 equals 方法被用作某个更大逻辑的一部分时,将其封装在一个 BiPredicate 中可以使代码结构更清晰。与 Java 8+ 的流式处理结合 :如果你正在使用 Java 8 或更高版本,并且利用流式处理(Streams)进行集合操作,那么方法引用可以与流式处理结合使用,以简洁的方式表达复杂的逻辑。框架和库的要求 :有些框架和库可能要求你使用方法引用或 Lambda 表达式来满足其 API 的要求。在这种情况下,即使直接使用 equals 方法可能更简单,你也需要遵循框架或库的约定。
当然,在简单的直接比较场景中,直接使用 equals 方法通常是最简单和最直接的选择。但在更复杂的场景中,使用方法引用或其他函数式编程特性可以提供更多的灵活性和表达能力。最终的选择取决于具体的需求和上下文。
样例三
 1
 2
 3
 4
 5
 6
 7
 8
 9
10
11
//Function中R apply(T t)
//EmpLoyee中的string getName();
public void test7 () {
Employee employee = new Employee ( 1001 , "Tom" , 23 , 5600 );
Function < Employee , String > func1 = e -> e . getName ();
System . out . println ( func1 . apply ( employee ));
Function < Employee , String > func2 = Employee :: getName ;
System . out . println ( func2 . apply ( employee ));
}
Comparator 中的 int comapre(T t1,T t2)String 中的 int t1.compareTo(t2)
BiPredicate 中的 boolean test(T t1, T t2);String 中的 boolean t1.equals(t2)
Function 中 R apply(T t)EmpLoyee 中的 string getName();
上面方法的第一个参数,作为下面方法的调用者
错误案例
 1
 2
 3
 4
 5
 6
 7
 8
 9
10
// 错误
Function < Integer , Integer > f = Random :: nextInt ;
Integer apply = f . apply ( 10 );
System . out . println ( apply );
// 正确
Random random = new Random ();
Function < Integer , Integer > f = random :: nextInt ;
Integer apply = f . apply ( 10 );
System . out . println ( apply );
Random::nextInt 错误,分析如下
通过上面的例子我们可以发现,在使用 类名::实例方法 的情况时,这个实例方法必须有一个对象调用他们
比如: s1.compareTo(s2)、s1.equals(s2)、e.getName()
而我们用的 nextInt,也需要有一个对象调用它,所以我们只能创建一个 Random 对象,使用 对象::实例方法 的方式
构造器引用
构造器引用:和方法引用类似,函数式接口的抽象方法的形参列表和构造器的形参列表一致。抽象方法的返回值类型即为构造器所属的类的类型
 1
 2
 3
 4
 5
 6
 7
 8
 9
10
//Supplier 中的 T get()
//EmpLoyee 的空参构造器:EmpLoyee()
public void test1 () {
Supplier < Employee > sup1 = () -> new Employee ();
Ststem . out . println ( sup1 . get ());
Supplier < Employee > sup2 = Employee :: new ;
Ststem . out . println ( sup2 . get ());
}
 1
 2
 3
 4
 5
 6
 7
 8
 9
10
11
//Function 中的 R apply(T t)
public void test2 () {
Function < Integer , Employee > func1 = id -> new Employee ( id );
Employee employee = func1 . apply ( 1001 );
System . out . println ( employee );
Function < Integer , Employee > func2 = Employee :: new ;
Employee employee1 = func2 . apply ( 1002 );
System . out . println ( employee1 );
}
 1
 2
 3
 4
 5
 6
 7
 8
 9
10
11
//BiFunction 中的 R apply(T t, U u)
public void test3 () {
Function < Integer , String , Employee > func1 = ( id , name ) -> new Employee ( id , name );
Employee employee = func1 . apply ( 1001 , "张三" );
System . out . println ( employee );
Function < Integer , Employee > func2 = Employee :: new ;
Employee employee1 = func2 . apply ( 1002 , "李四" );
System . out . println ( employee1 );
}
数组引用
数组引用: 可以把数组看做是一个特殊的类,则写法与构造器引用一致
 1
 2
 3
 4
 5
 6
 7
 8
 9
10
//Function中的R apply(T t)
public void test4 () {
Function < Integer , String []> func1 = length -> new String [ length ] ; //length 数组的长度
String [] arr = func1 . apply ( 5 );
System . out . println ( Arrays . toString ( arr ));
Function < Integer , String []> func2 = String [] : new ;
String [] arr2 = func2 . apply ( 10 );
System . out . println ( Arrays . tostring ( arr2 ));
}
函数式接口
构造方法引用
构造器引用
语法:
旧 → 类名 s = new 构造方法();
新 → 类名::new
注意事项:函数式接口的抽象方法的形参列表和构造器的形参列表一致,抽象方法的返回值类型即为构造器所属的类的类型。
类似于 s -> new student(s) => student::new
以前调用构造方法创建对象 Student s = new Student();
函数式接口调用构造方法创建对象 Student :: new
 1
 2
 3
 4
 5
 6
 7
 8
 9
10
11
12
13
14
15
16
17
18
19
20
21
22
23
24
25
26
27
28
29
30
31
32
public class ConstructorMethodDemo {
//自定义函数式接口
@FunctionalInterface
interface MyFunctionalInterface < T , U , K , R > {
R transfer ( T t , U u , K k );
}
public static void main ( String [] args ) {
//无参构造方法 Supplier<T> 供给型
Supplier < student > supplier = Student :: new ;
Student stu1 = supplier . get ();
System . out . println ( stu1 );
//一个参数
Function < String , Student > function = Student :: new ;
Student stu2 = function . apply ( "李四" );
System . out . println ( stu2 );
//两个参数
BiFunction < string , Integer , Student > biFunction = Student :: new ;
Student stu3 = biFunction . apply ( "王五" , 18 );
System . out . println ( stu3 );
//多个参数,需要自定义函数式接口(可参考BiFunction)
//三个参数自定义函数式接口
MyFunctionalInterface < string , Integer , string , student > my = Student :: new ;
Student stu4 = my . transfer ( "张三" , 23 , "男" );
system . out . println ( stu4 );
}
}
数组引用
如果是创建数组对象,数组在创建时需要指定维度,需要传值
1
2
3
4
// 创建数组对象 string[] strs = new string[3];
Function < Integer , string []> fun = string [] :: new ;
String [] strings = fun . apply ( 5 ); //数组的长度为5
System . out . println ( Arrays . tostring ( strings ));